Building around a position: Using the CM-A in FM22
The Central Midfielder (Attack) has been getting a lot of love from our community this year and that’s no surprise. It’s an industrious, versatile midfield role that adds another strong goalscoring threat to your starting lineup. Here we’ll show you how to build a successful team around that specific role in FM22.
Crafting a shape
To build a winning tactic around a specific role and duty combination, you need to have a proper understanding of what the role does.
As defined in-game, the Central Midfielder provides a direct link between defence and attack. While available with Defend, Support and Attack duties, opting for the latter means that they’ll look to get further forward more often and surge into the final third.
With that in mind, you want a system where the Central Midfielder on Attack (CM-A) is going to be able to receive regular passes and have the freedom to push up and join attacking moves. A variety of formations work well with this role, particularly those that don’t employ attacking midfielders such as 4-3-3, 4-5-1 or a 5-3-2. To keep things simple, we’re working with a 4-4-2 here with the CM-A in the left central midfielder slot.
If they’re going to be bombing forward on a regular basis, their midfield partner needs to sit deeper and offer more defensive cover. There are a range of options here that you can work with but we’ve chosen the Ball-Winning Midfielder with Defend duty. When in possession, these two roles could almost help the team shape change to a 4-4-2 diamond – great for fans of deep-lying playmakers and classic 10s when going forward and those who like the rigidity and width of a flat midfield four when defending.
Now that’s in place, you need to start thinking about their attacking movement. If the CM-A is on the left-hand side of the pitch, you probably don’t want a wide player on the left who’ll regularly be cutting in and moving into the same space. You could go down that route if you wanted to overload a single opposition defender but it’s probably best avoid. Instead, we’d recommend a Winger with Support duty with the added instruction to Stay Wider. They’ll focus on dribbling, stretching the opposition defence and getting crosses into the box, in turn opening a channel for the CM-A to drive into.
Having previously set your right central midfielder to be more defensive, the player on the right flank can afford to be a more offensively-minded player. We’ve opted for an Inverted Winger with Attack Duty – they’ll cut in before looking to either shoot or lay the ball off to a teammate, with the CM-A’s forward motion opening them up as another passing option.
Up front, we’ve selected an Advanced Forward on the left and a Target Forward on the right. The Advanced Forward will be, as the name suggests, advanced player in the team, spearheading the attack. They’ll chase down long balls and drift into wide channels where possible. When they do this, the CM-A becomes an auxiliary striker, taking their spot in the box. This is where the CM-A can really provide unique value that differentiates it from other midfield roles. No other offence-minded role in central midfield will drive forward as aggressively to support an attack as a CM-A will.
The Target Forward, meanwhile, will look to move into space and hold up the ball. They’ll tend to win a lot of aerial challenges, providing flick-ons and knockdowns for their striker partner and the CM-A to run on to.
Finally, there’s the back four. Directly behind the Winger (Support) you’ve got a supporting Full-Back, while overlapping the Inverted Winger on the right is a Wing-Back who’ll offer more crossing options from that flank. To avoid having the two centre-backs doing the same thing, we’ve set it up so that one pushes up and one stays deeper. The more advanced of the two, the Stopper, will push into the space vacated by the CM-A – a good candidate for this role is a tall defender with high Aggression and Physical attribute scores.
When you add all of that together, you get something like the below tactic that we’ve put together while managing Stoke City in the Sky Bet Championship.
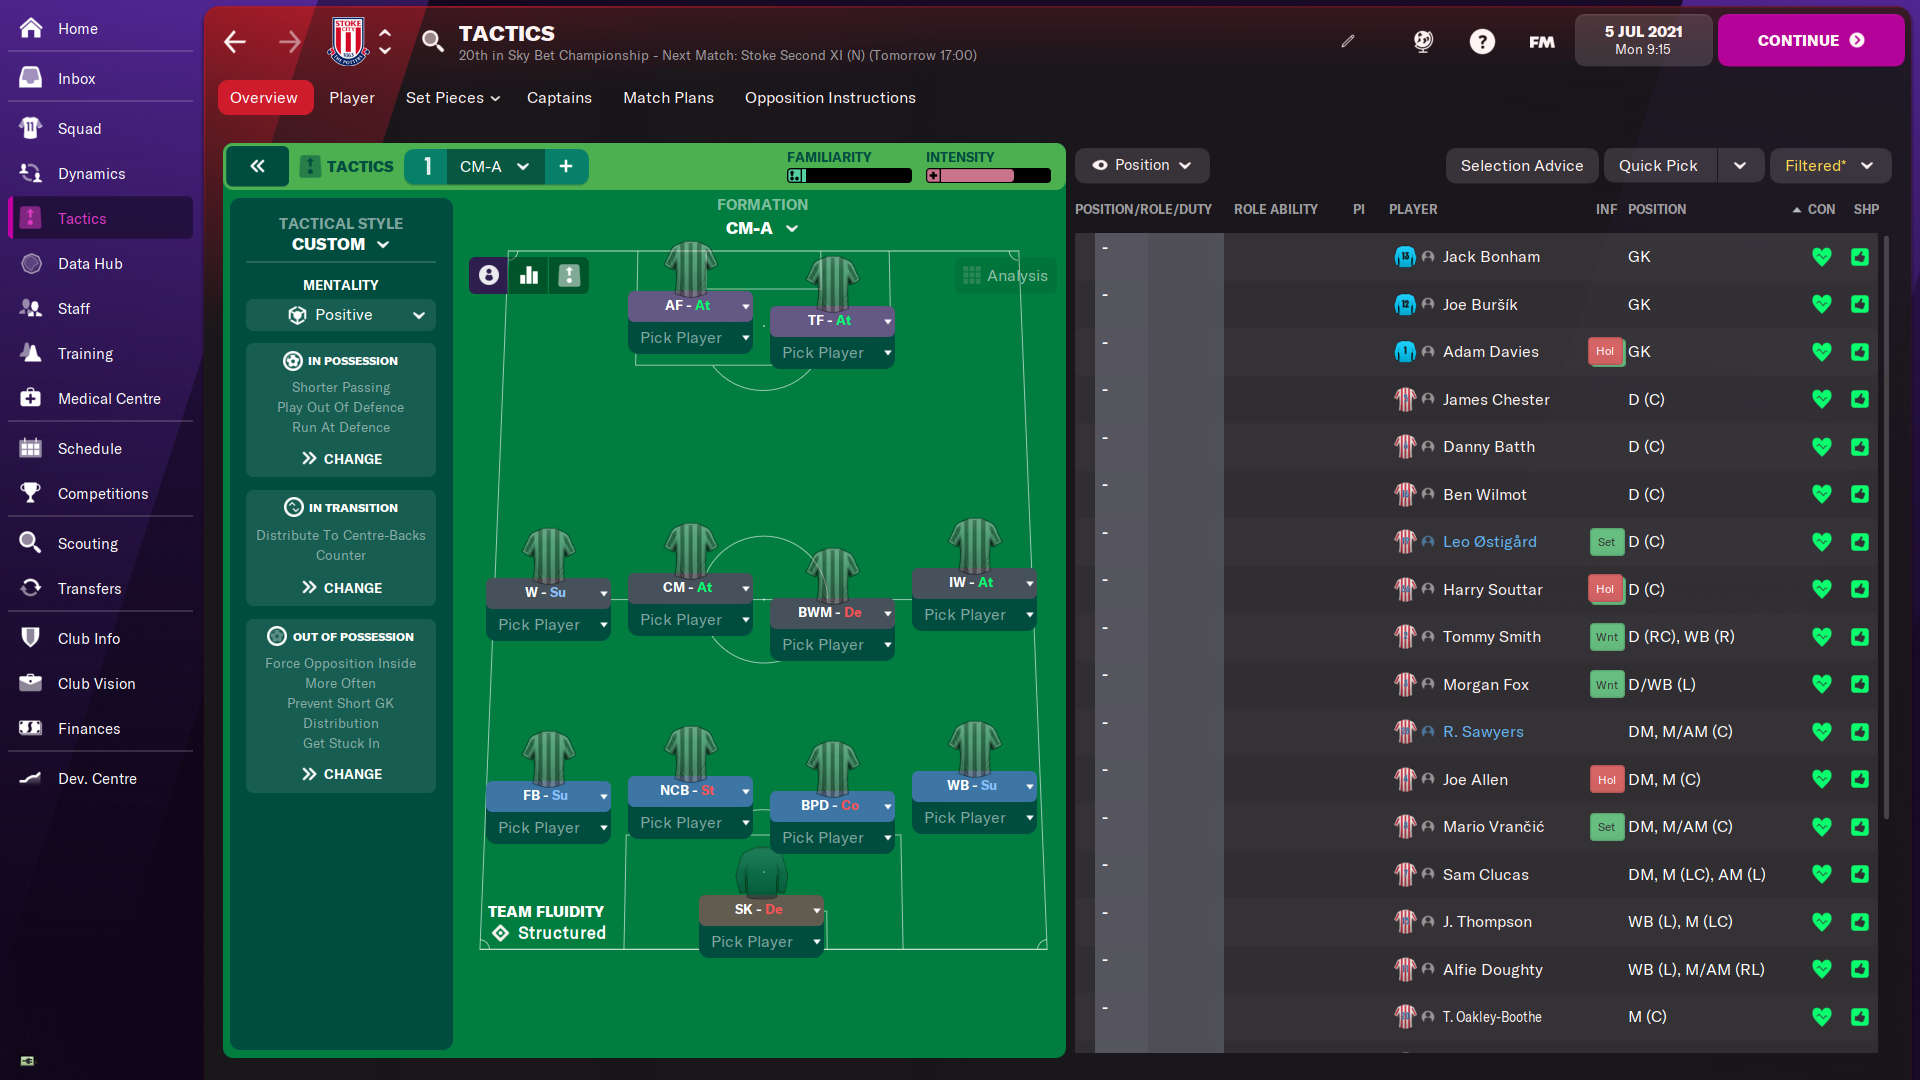
We’ve not gone too heavy on the Tactical Instructions here. Opting for Shorter Passing allows for the CM-A to be more involved in the build-up play, while Get Stuck In means that the team on the whole will be aggressive in trying to win the ball back.
To get the most from the CM-A, you’ll want them to have the additional positional instructions to Take More Risks and Shoot More Often. Playing with a Higher Line of Engagement will likely generate more chances for the player in question but with Stoke we’ve kept this at the standard level because they’re not the quickest side and we don’t want to get exposed defensively by creating too big a gap between the defence and the midfield.
Picking the right player
Stoke City were a strong choice for this piece because they boast several midfield options who can thrive in the CM-A role.
The key Attributes you’re looking for in a CM-A include, but are not limited to: First Touch, Long Shots, Passing, Decisions, Anticipation, Teamwork, Vision, Work Rate, Acceleration and Stamina.
Nick Powell has a strong goalscoring record from midfield, while Sam Clucas and Jordan Thompson both possess great versatility.
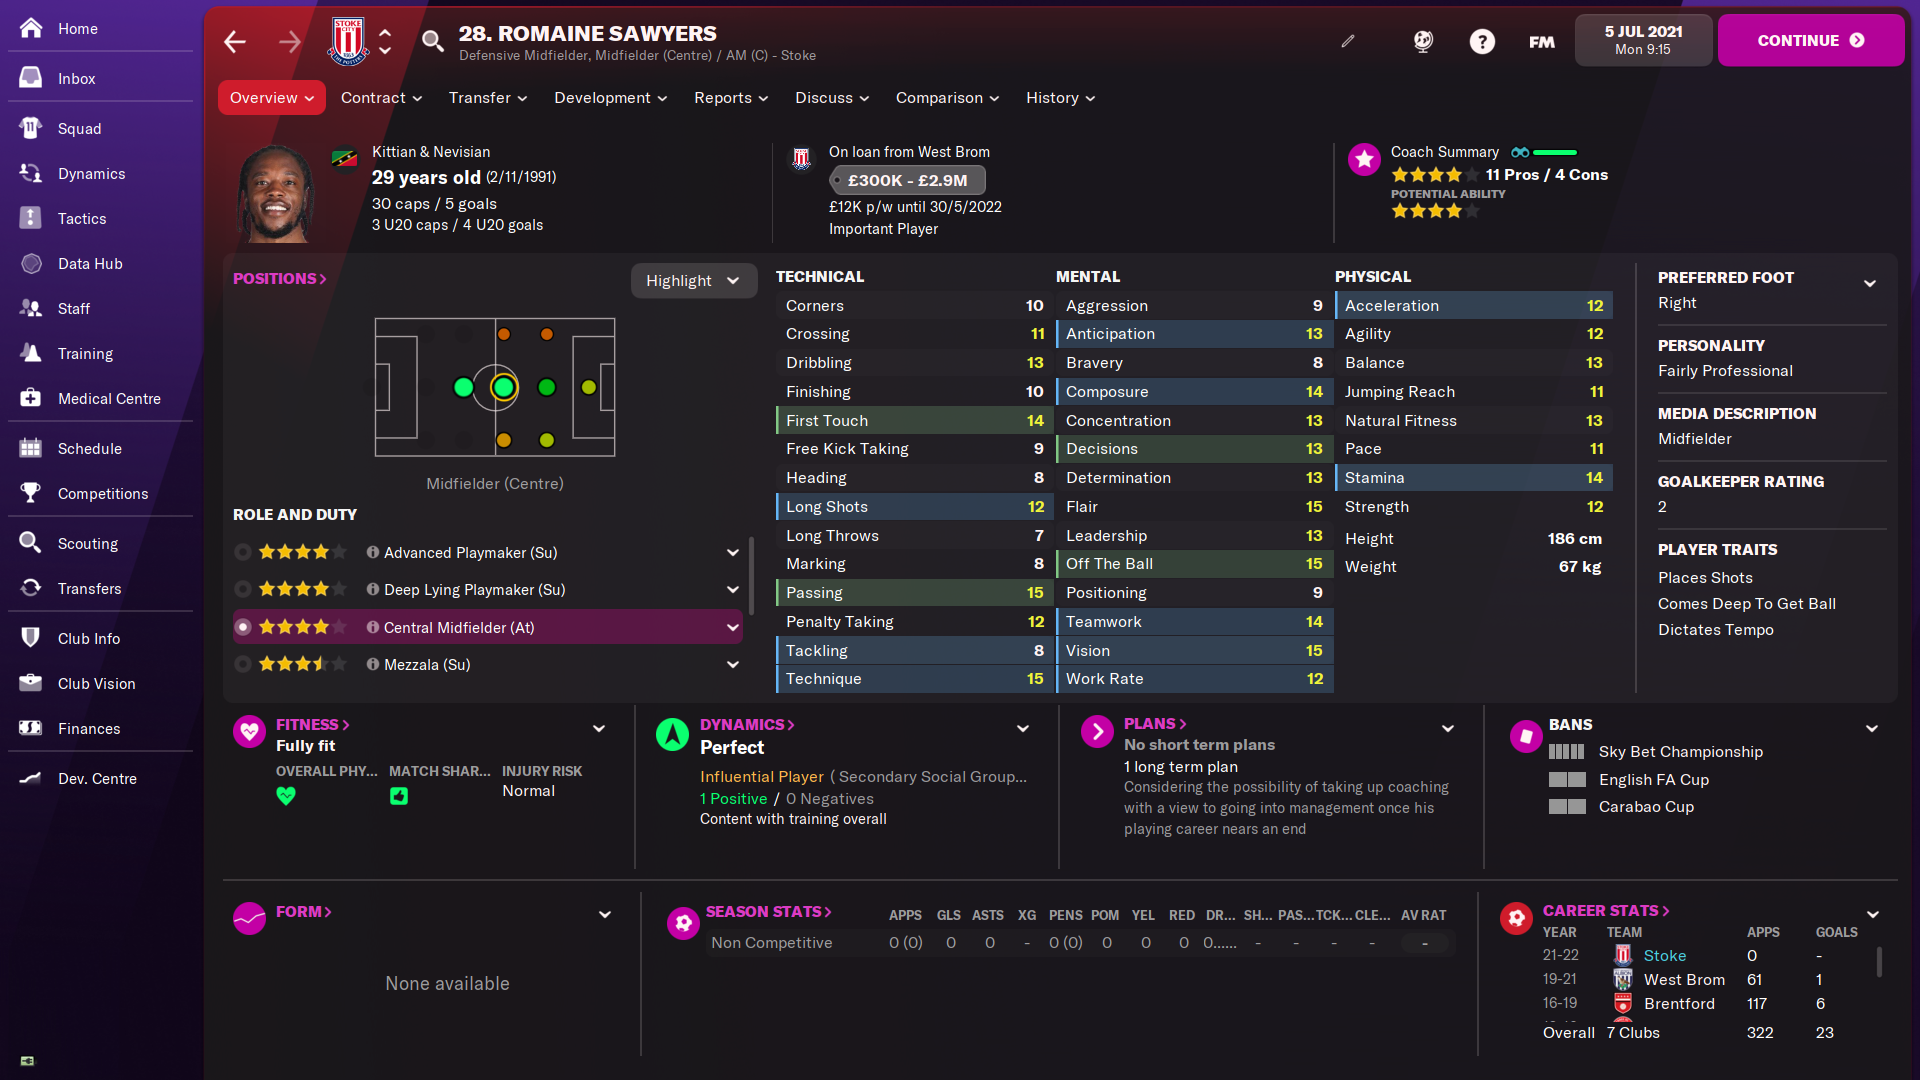
Bosnian international Mario Vrančić might not be the quickest but he ticks a lot of the boxes here with 14 Long Shots and 14 First Touch. However, the best choice on paper appears to be West Bromwich Albion loanee Romaine Sawyers. He has 14 First Touch, 15 Passing, 14 Stamina and 15 Off the Ball. He also, interestingly, has the Places Shots trait.
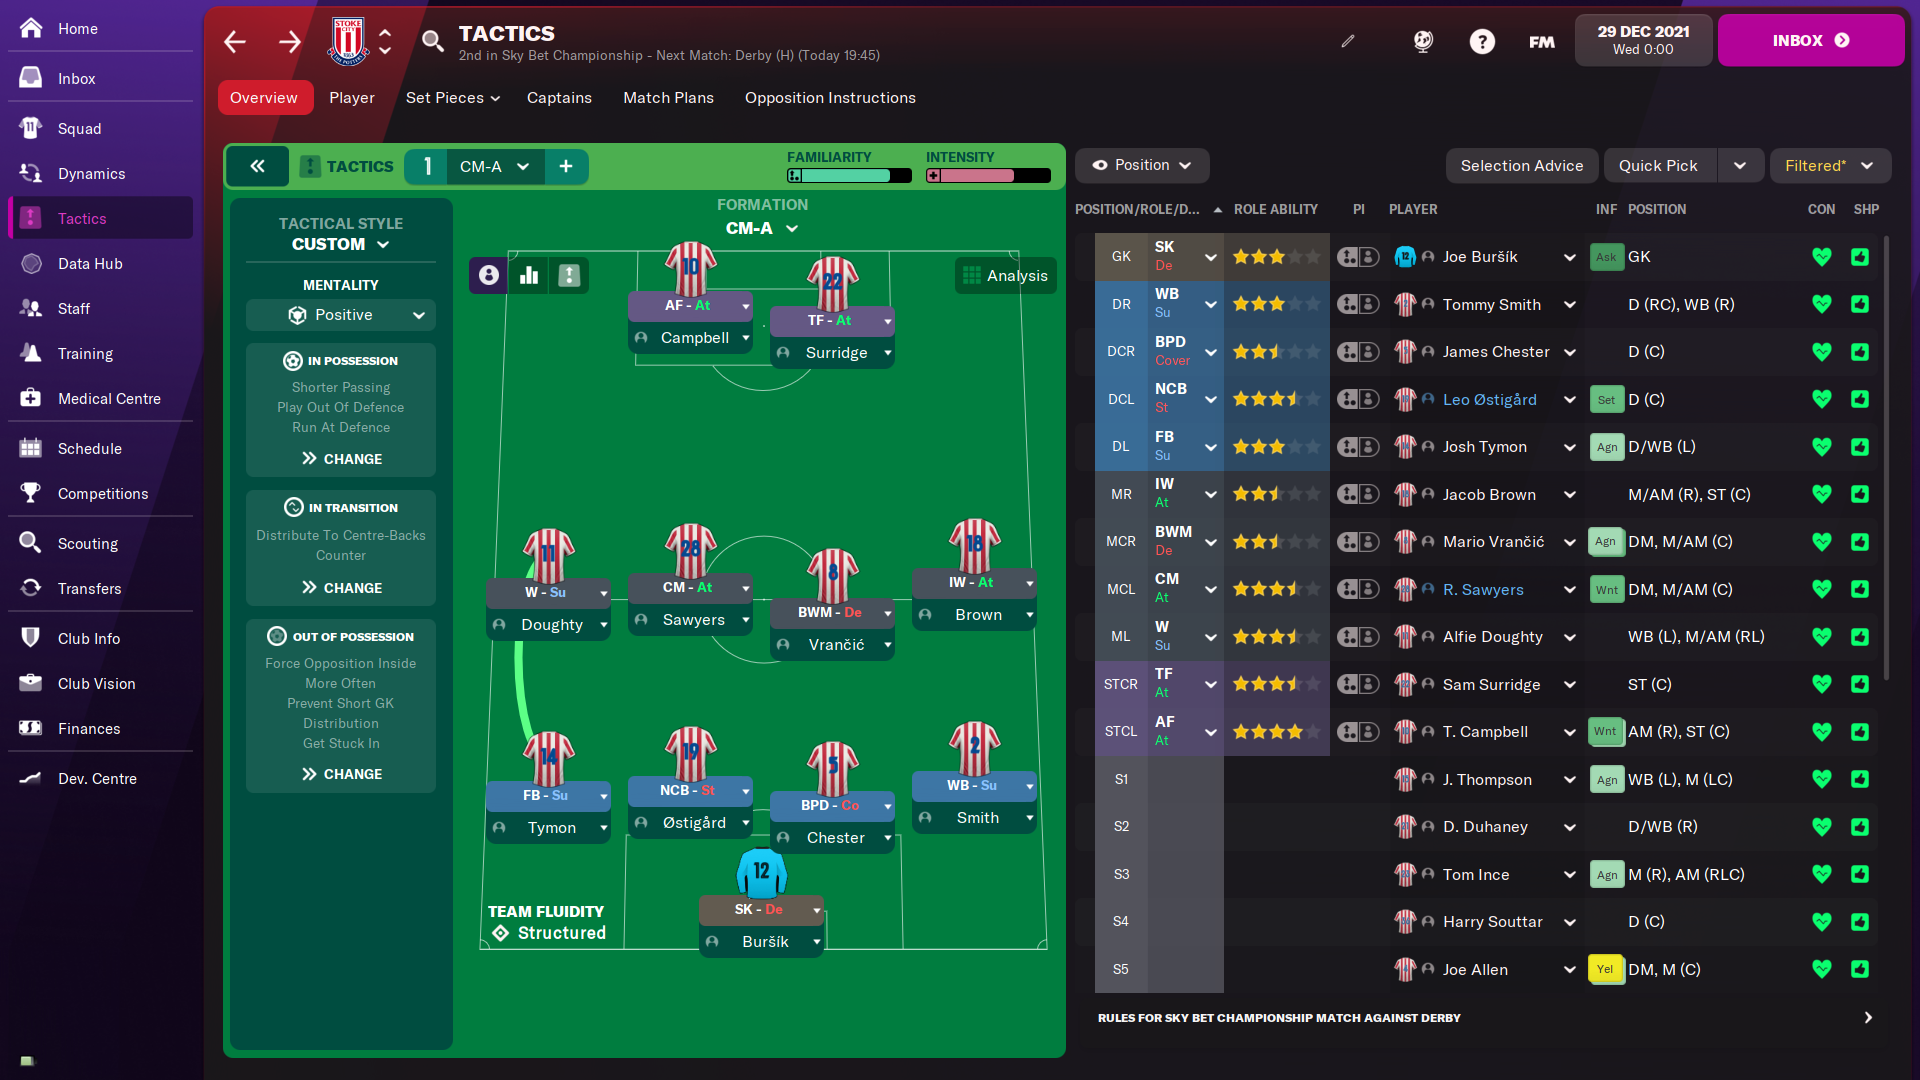
All those options got a run-out in pre-season, with Vrančić and Sawyers appearing to be the most natural fits for the role. As such, here is the first-choice Stoke team we’ve put together.
Putting it to the test
To put our tactic built around the Central Midfielder on Attack duty to the test, we played through the first half of the season.
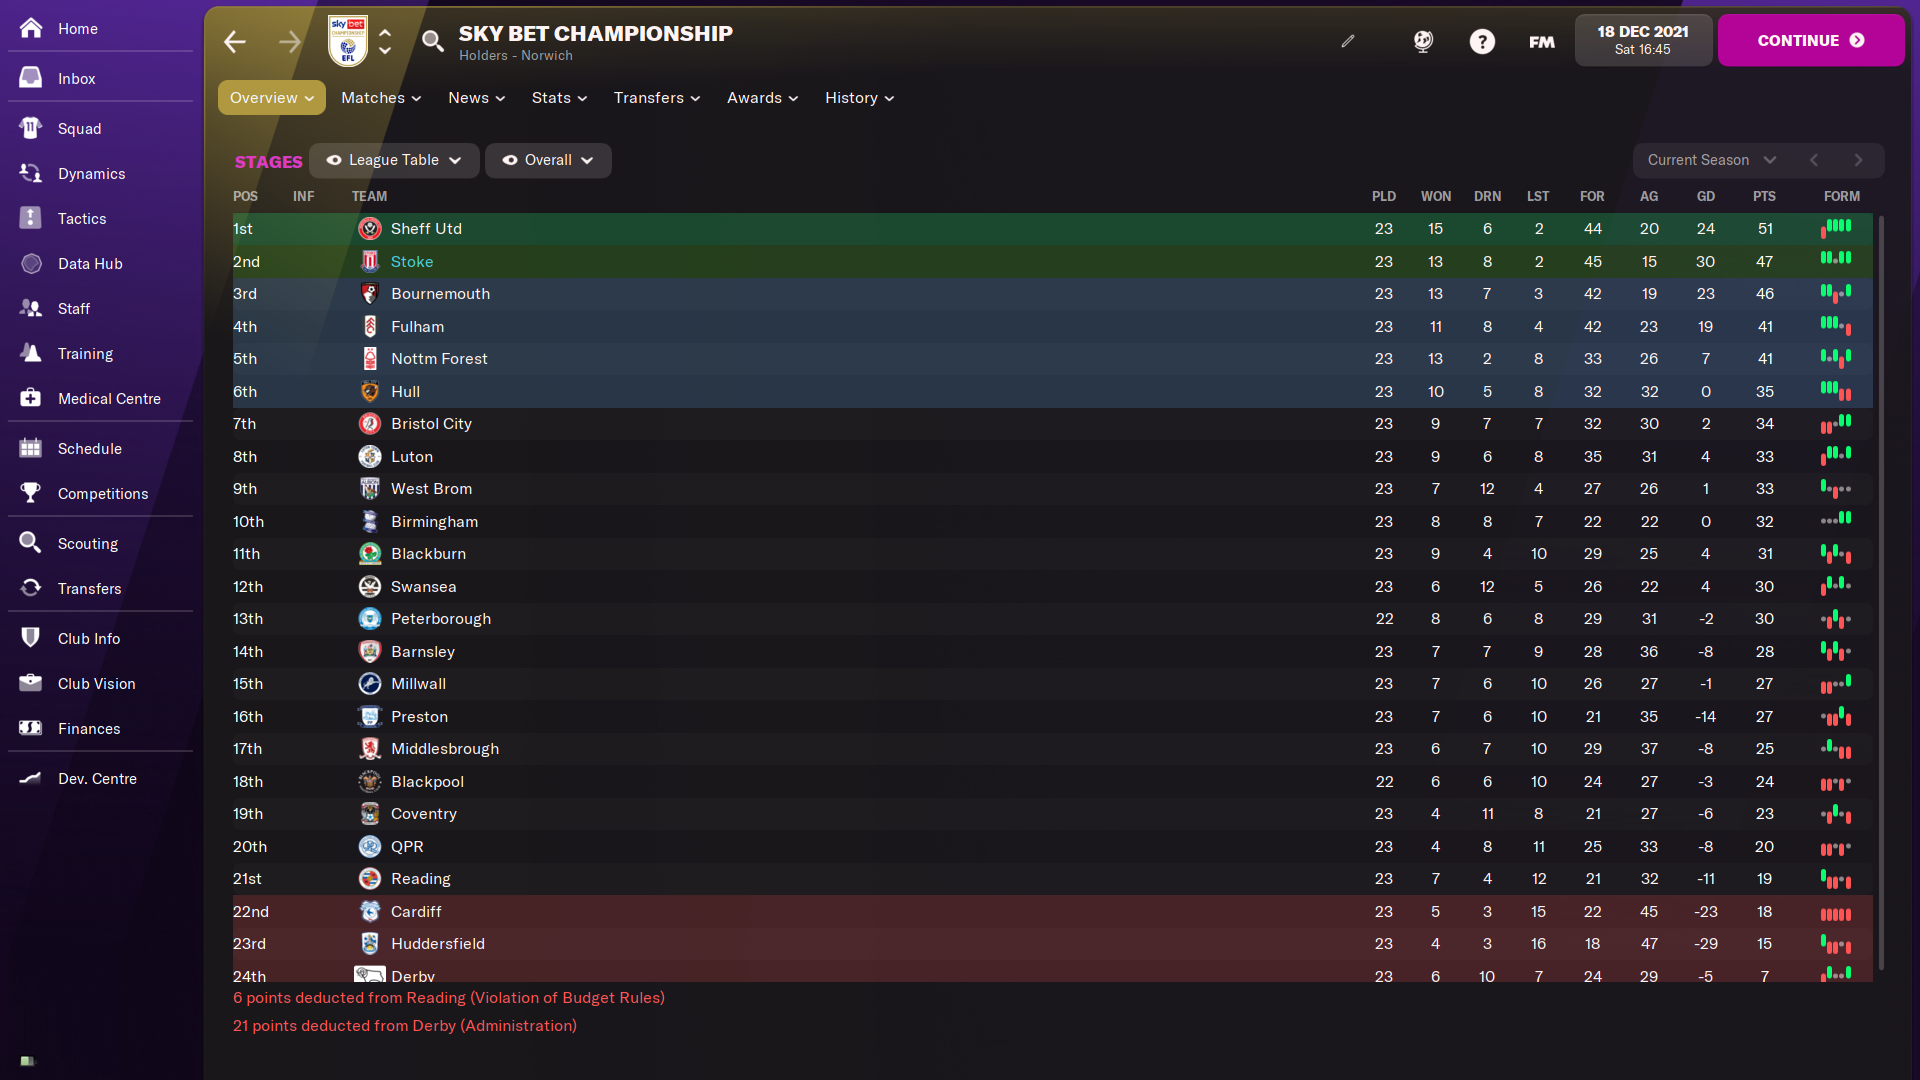
After 23 games, The Potters are second in the Sky Bet Championship table. They’ve scored more goals than anyone else and have got the meanest defence. They’re also just four points off Sheffield United in top spot. Judging by the table alone, the tactic has been a resounding success. However, let’s dig into some of the matches and stats provided by the Data Hub to see what’s worked.
Sawyers missed eight games with an injury but he proved very consistent, averaging 7.07 across his 15 appearances with one goal and two assists. From his 26 shots he had an xG of 2.38, so statistically should have scored more often.
While those numbers were slightly lower than anticipated, watching back many of the games he was involved in demonstrates that ratings aren’t always everything. During most Stoke attacks, Sawyers was a regular fixture in the opposition penalty area, as you’ll see from the examples below.

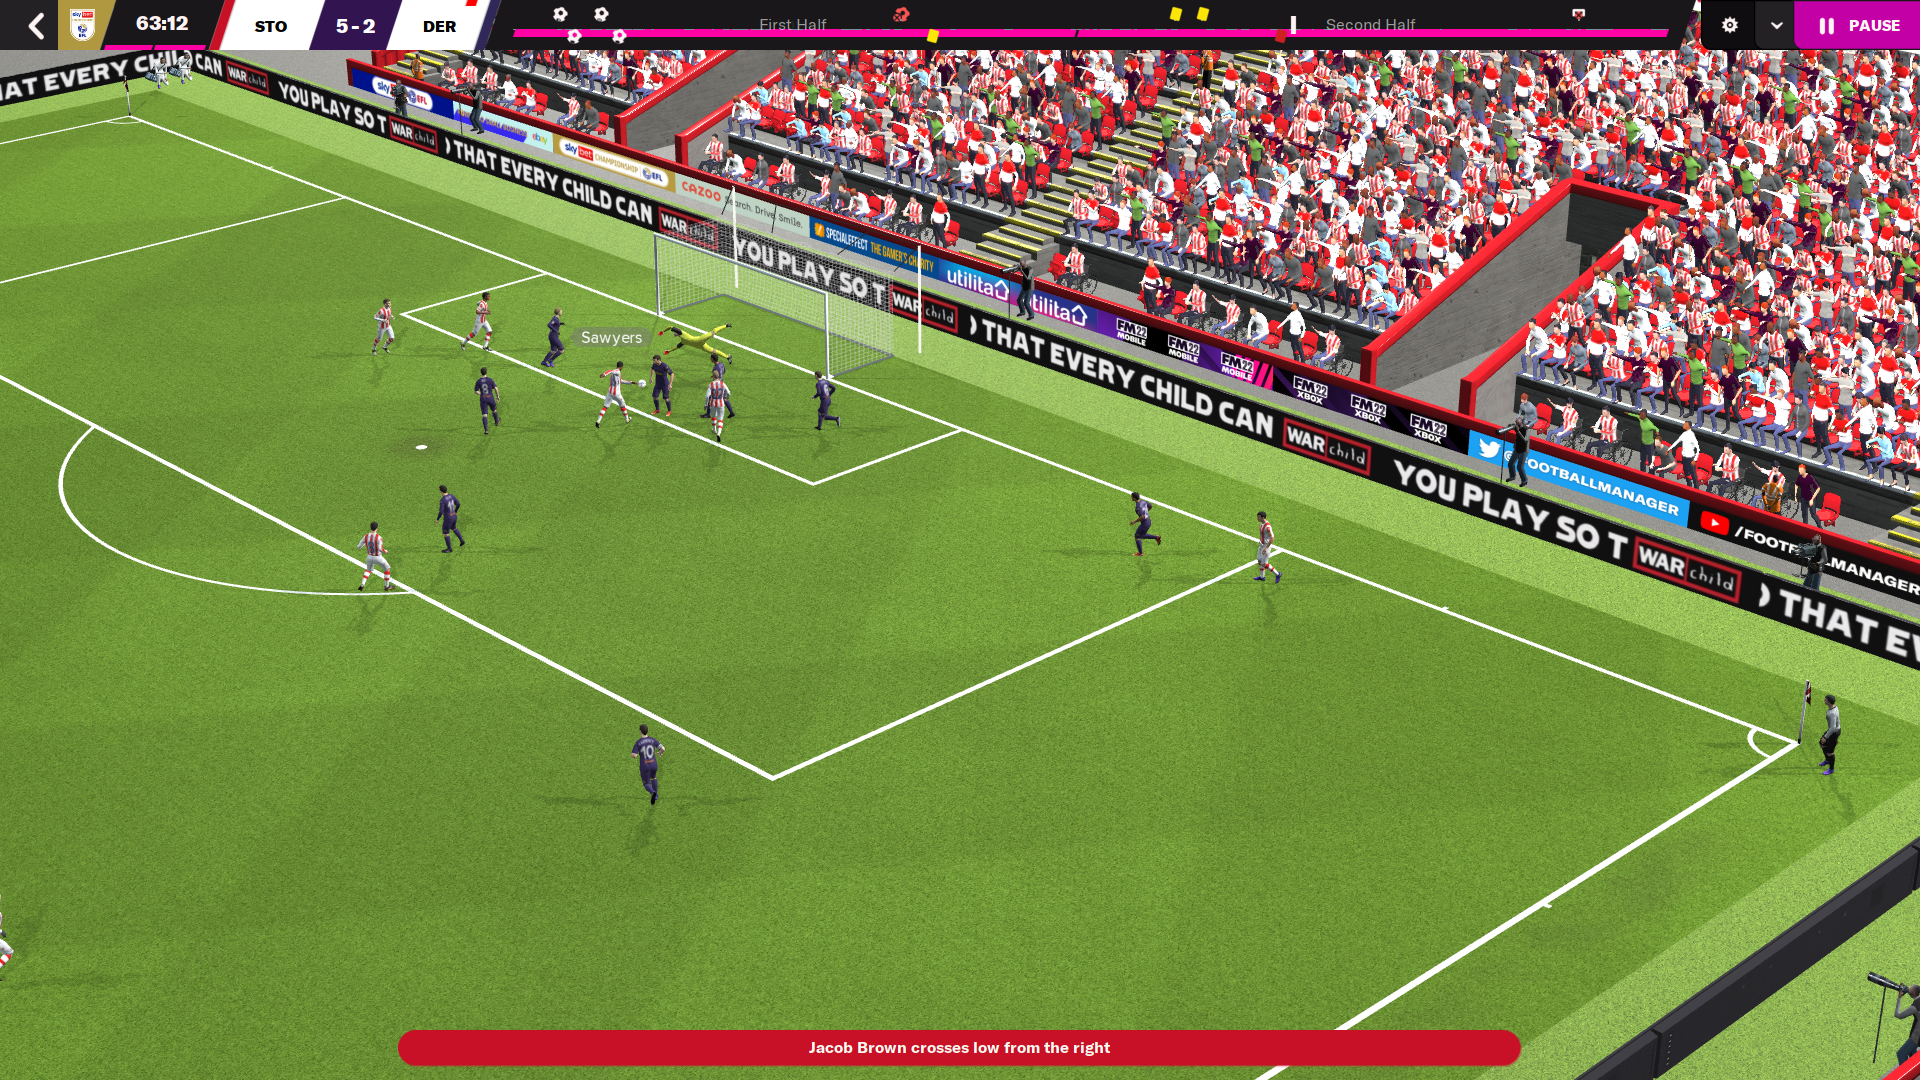
Even if he wasn’t getting on the end of crosses or through balls, his presence was enough to draw the attention of one defender. That, in turn, created more open looks for first-choice strikers Tyrese Campbell and Sam Surridge, who finished the first half of the season with 25 league goals between them.
In professional Ice Hockey they track what are called secondary assists, or ‘the pass before the pass’. Some football teams track these ‘pre-assist’ stats as well. Watching Sawyers’ performances back, he had seven of these pre-assists, most through being in and around the box and laying off to his teammates.
As you’ll see from the below Shooting – Midfielders chart, Sawyers was among the league leaders for shots per game, demonstrating the attacking threat this role and duty combination brought to the Stoke team.
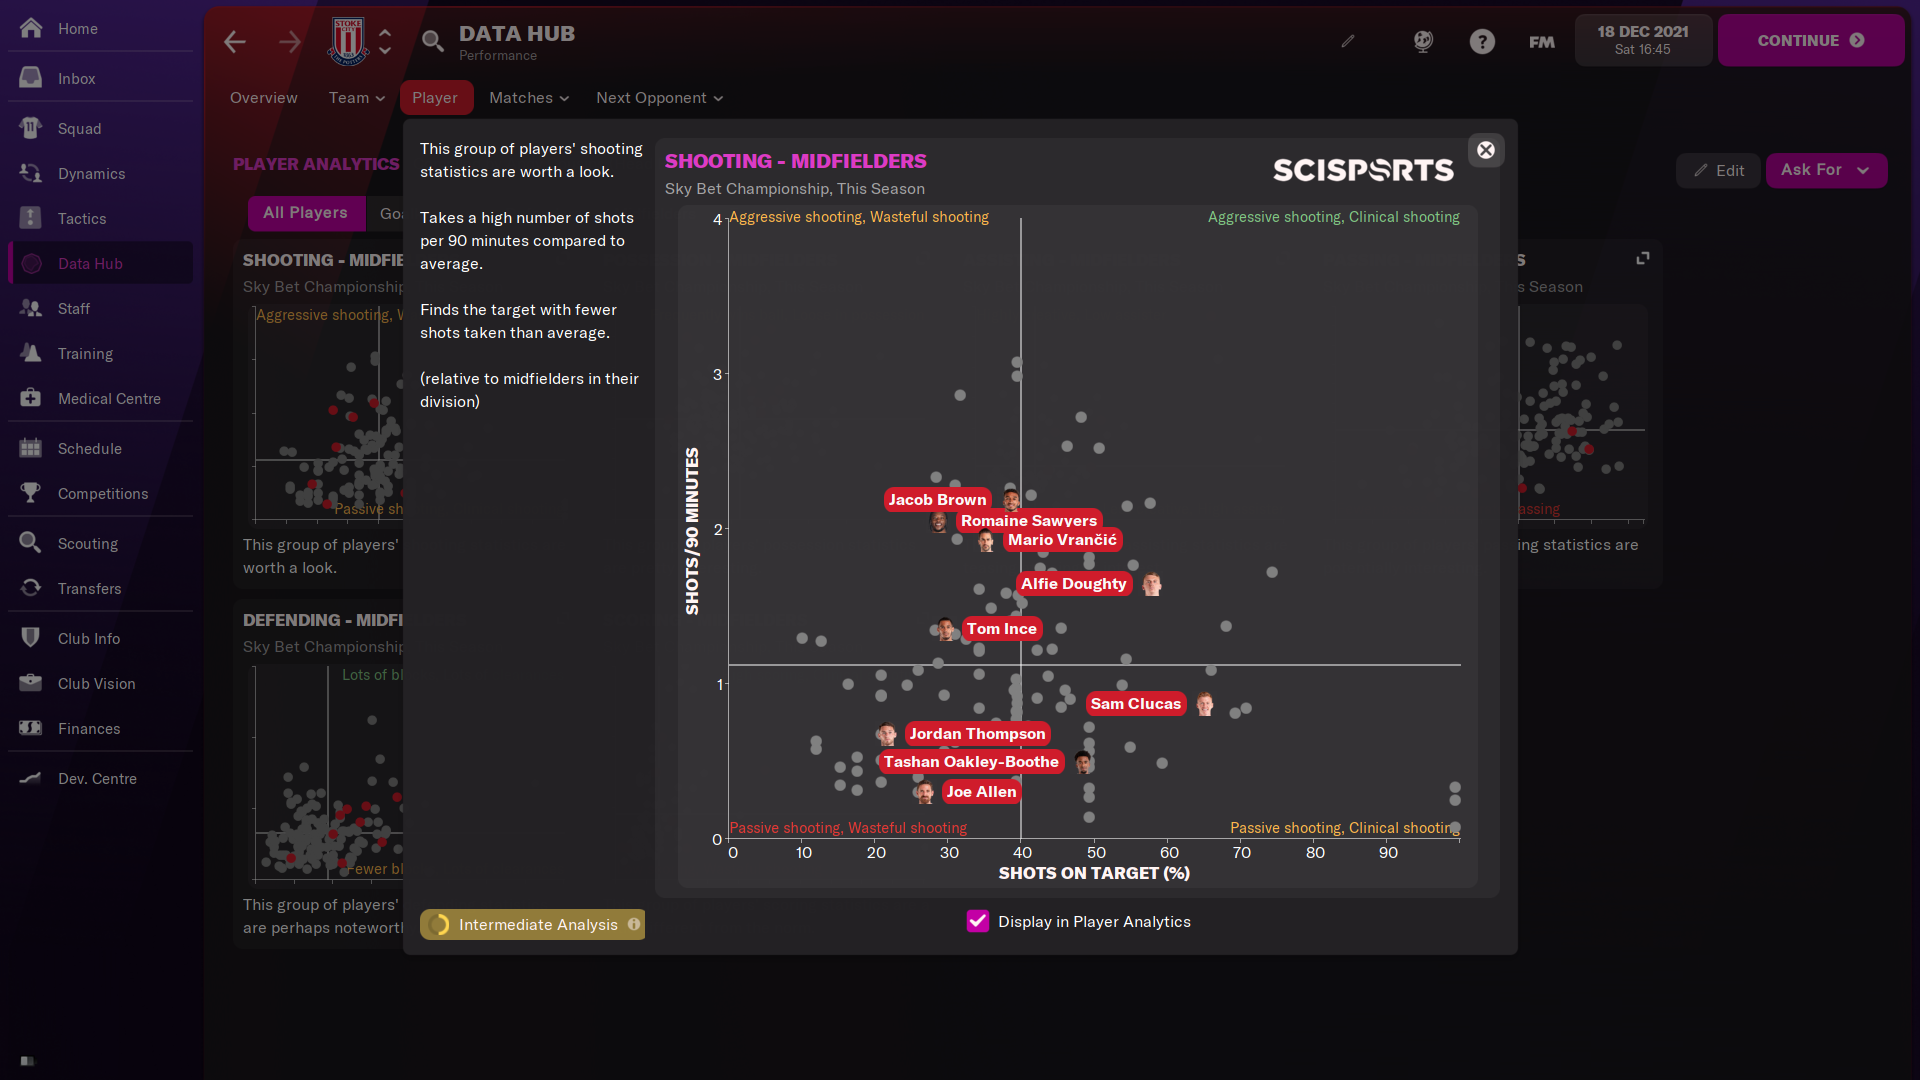
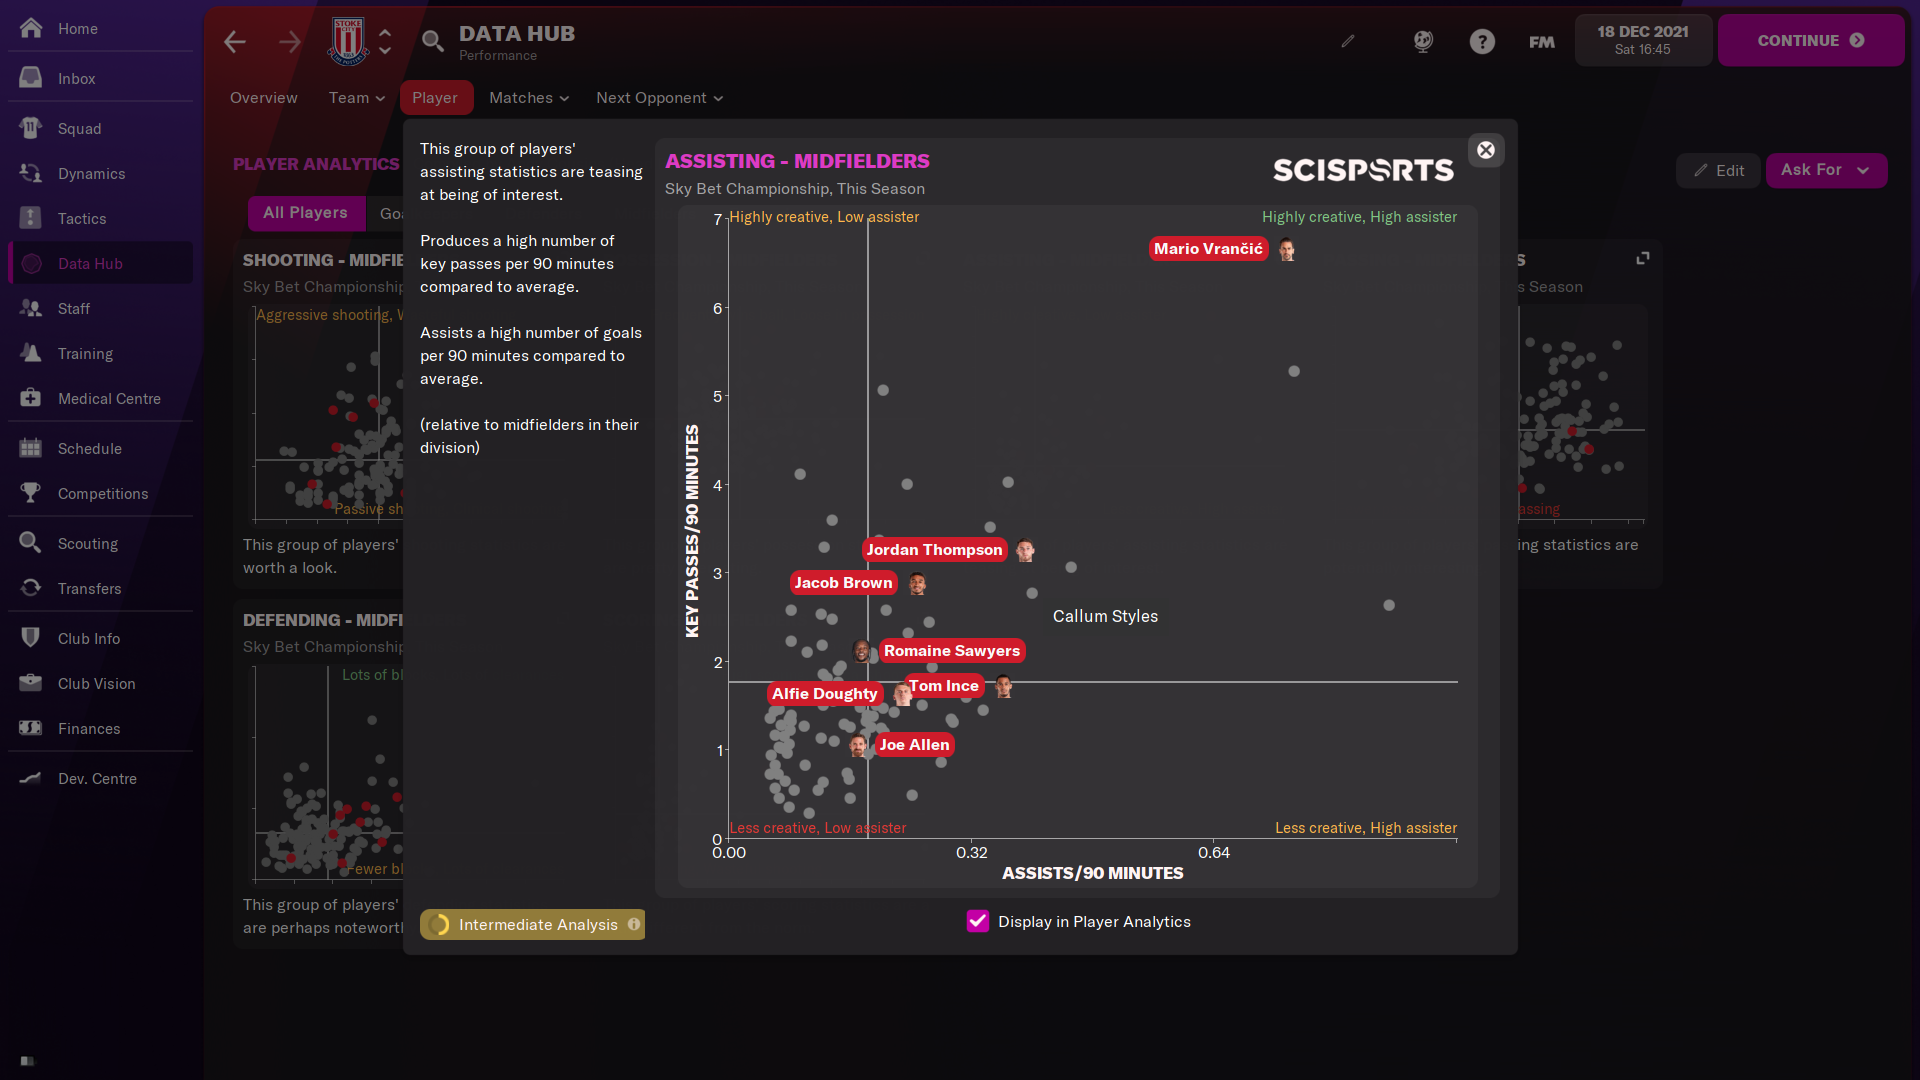
Also highly placed in that chart is Vrančić, who stepped into the team in Sawyers’ injury absence and proved a massively effective option off the bench. In his 14 appearances during the first half of the season, the Bosnian had the joint-highest rating of any player in the league with a 7.50 average. He’d scored three goals from an xG of 3.27 and provided seven assists. Like Sawyers, he’d also racked up a number of those secondary or pre-assists and sat seventh for cross completion percentage in the entire division.
The conversion rate of both Sawyers and Vrančić was a little low but that was to be expected with only a standard Line of Engagement. If you pushed that higher, they’d probably have scored more but the team would have been more exposed defensively.
In Summary
We hope that this piece has demonstrated that you can build an effective tactic around a specific role and duty combination, in this case the Central Midfielder on Attack.
Interested to see how this role could improved your team’s attacking threat? Try it out and let us know how you’ve got on across our social media channels.