Dominate with a 4-4-2 Narrow Diamond in FM23
For Football Manager 2021, Ihor Crusadertsar wrote about how to build a simple, winning tactic using the classic 4-4-2.
Now, he’s returned to The Byline to provide another explainer, this time inspired by a certain Portuguese coach and focused on the Narrow Diamond variant of the same formation.

Building a 4-4-2 Narrow Diamond
When approaching the creation of a new tactic, you should be thinking about how real footballers move on the pitch and how their positioning influences your style of play. Where should they be when you’re with and without the ball? When in possession, in which areas of the pitch do you want to create overloads? Do you want your players hitting balls long or building up slowly with lots of one-touch passes?
Upon building the tactic itself, the priority should be on creating something with flexibility, tactical variety and more than one outlet for your attack. One simple way to encourage this flexibility and variety is by making sure that every one of the 11 players has a role unique to them. Whether they’re occupying a different space, moving laterally rather than vertically, or operating with specific hardcoded instructions, this means that during your phases of play, they’ll all be doing something different.
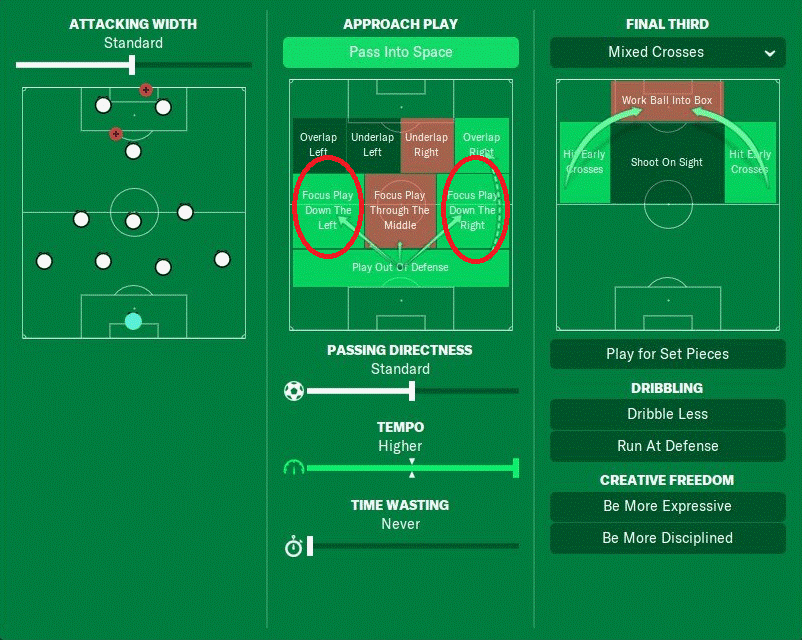
Defining your attacking options
The tactic I settled on for this article is shown in the screenshot below. I wanted to create something that was both defensively stable and had three or four players able to consistently exploit half-spaces and pressurise the opposition defence.
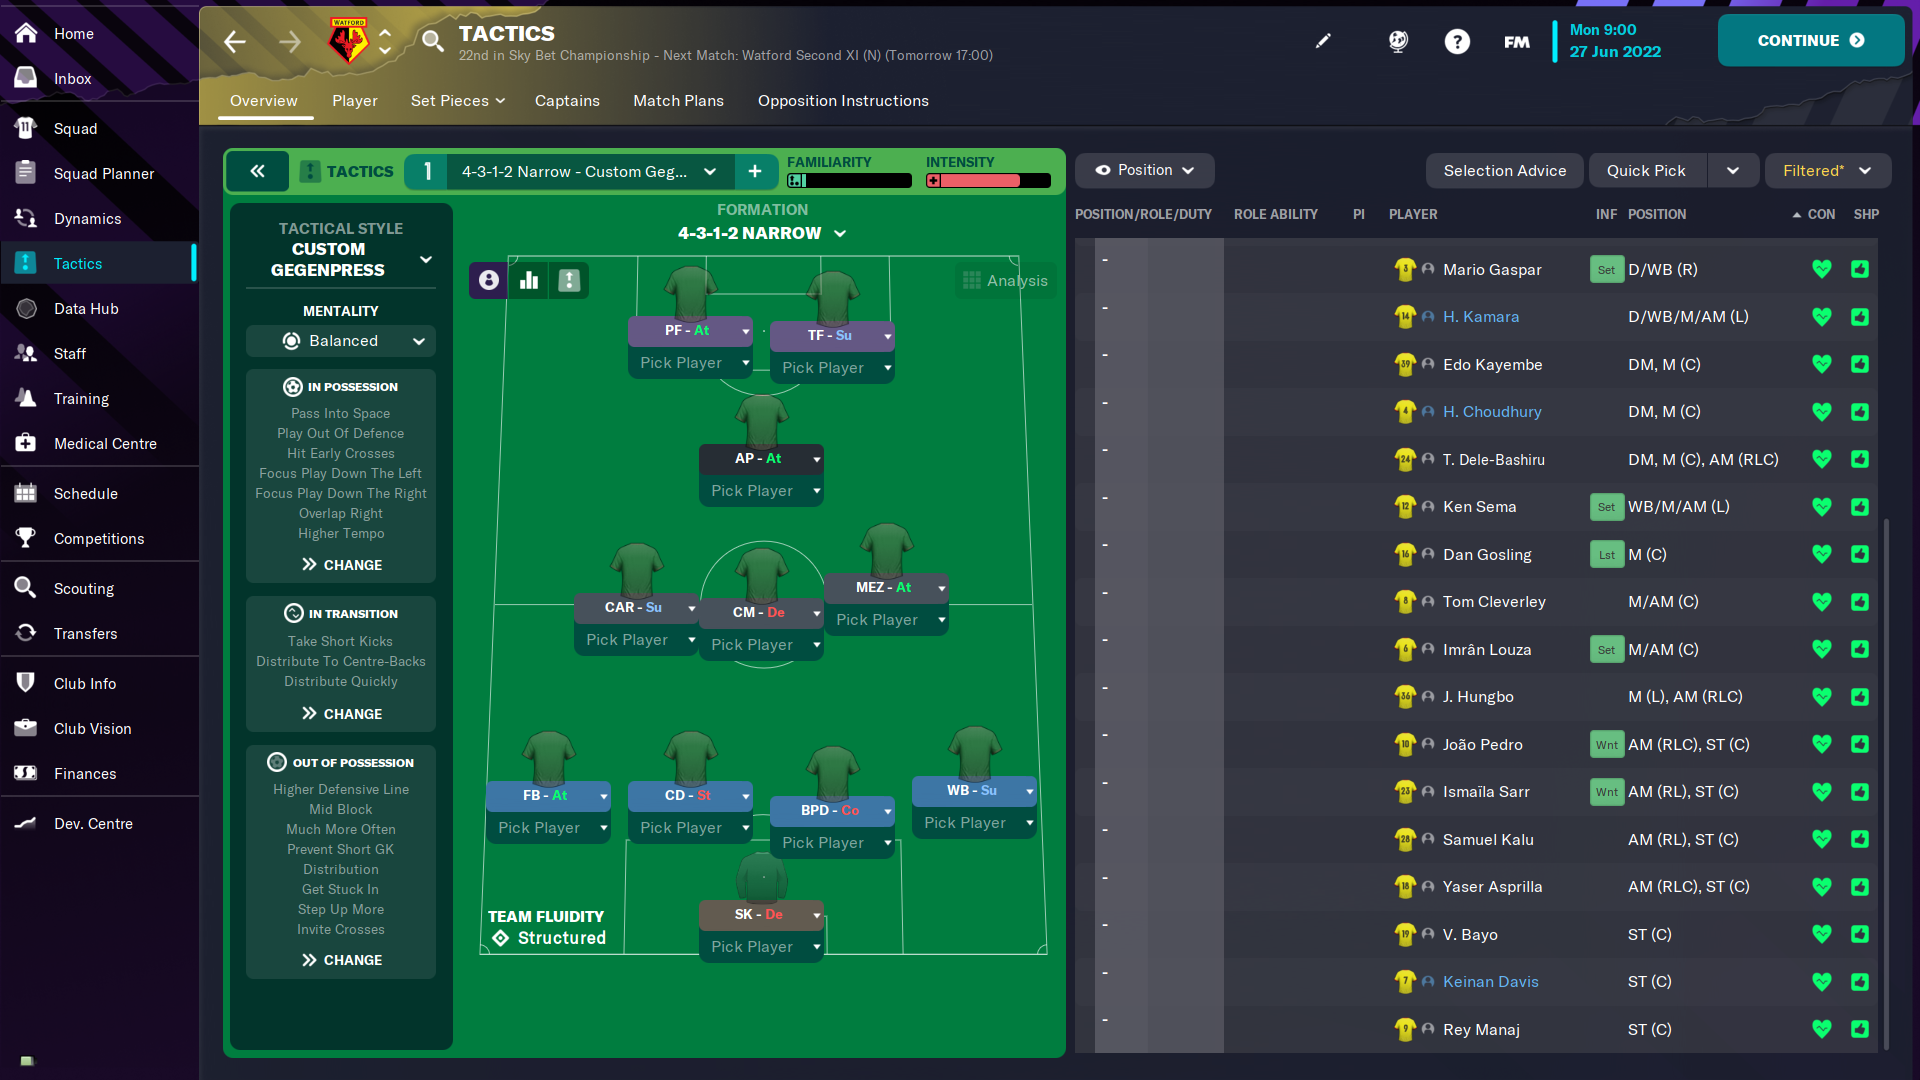
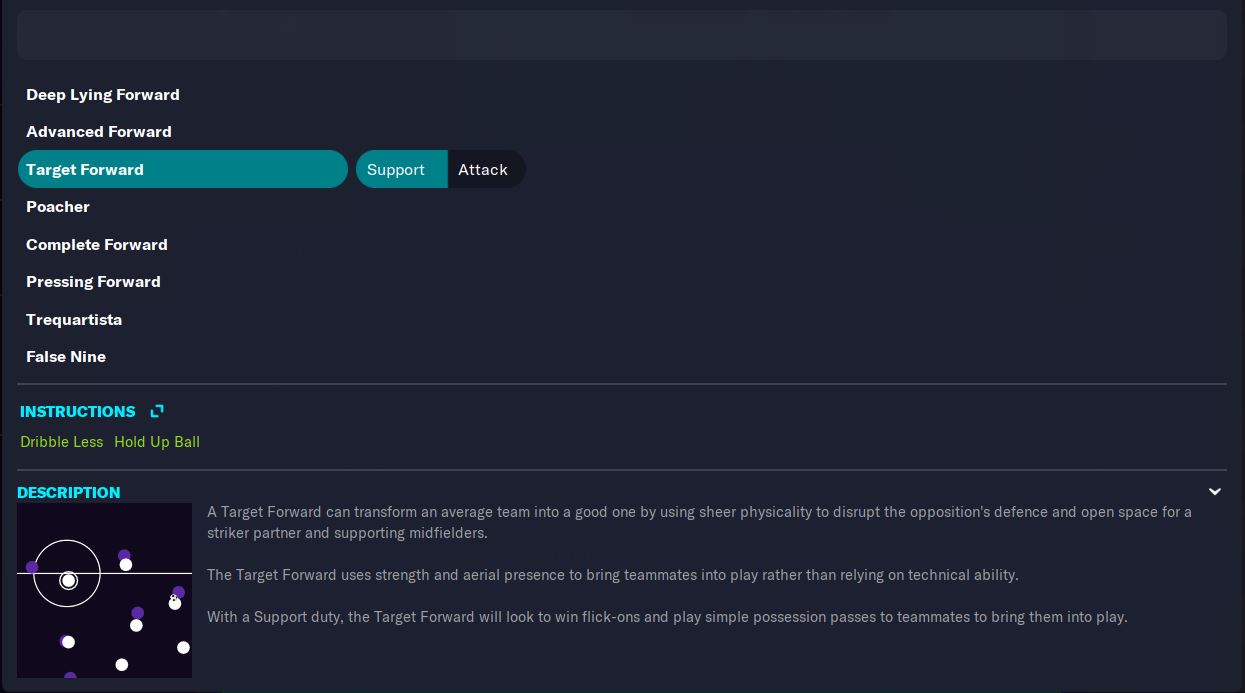
Up front, the two chosen striking roles are Pressing Forward and Target Forward. The Pressing Forward (or Advanced Forward if you have a player better suited to that role) pins the opposition defenders back and is willing to move into channels. Although their Attributes may make them a regular goal threat, the Target Forward is mostly here to fulfil a creative support role.
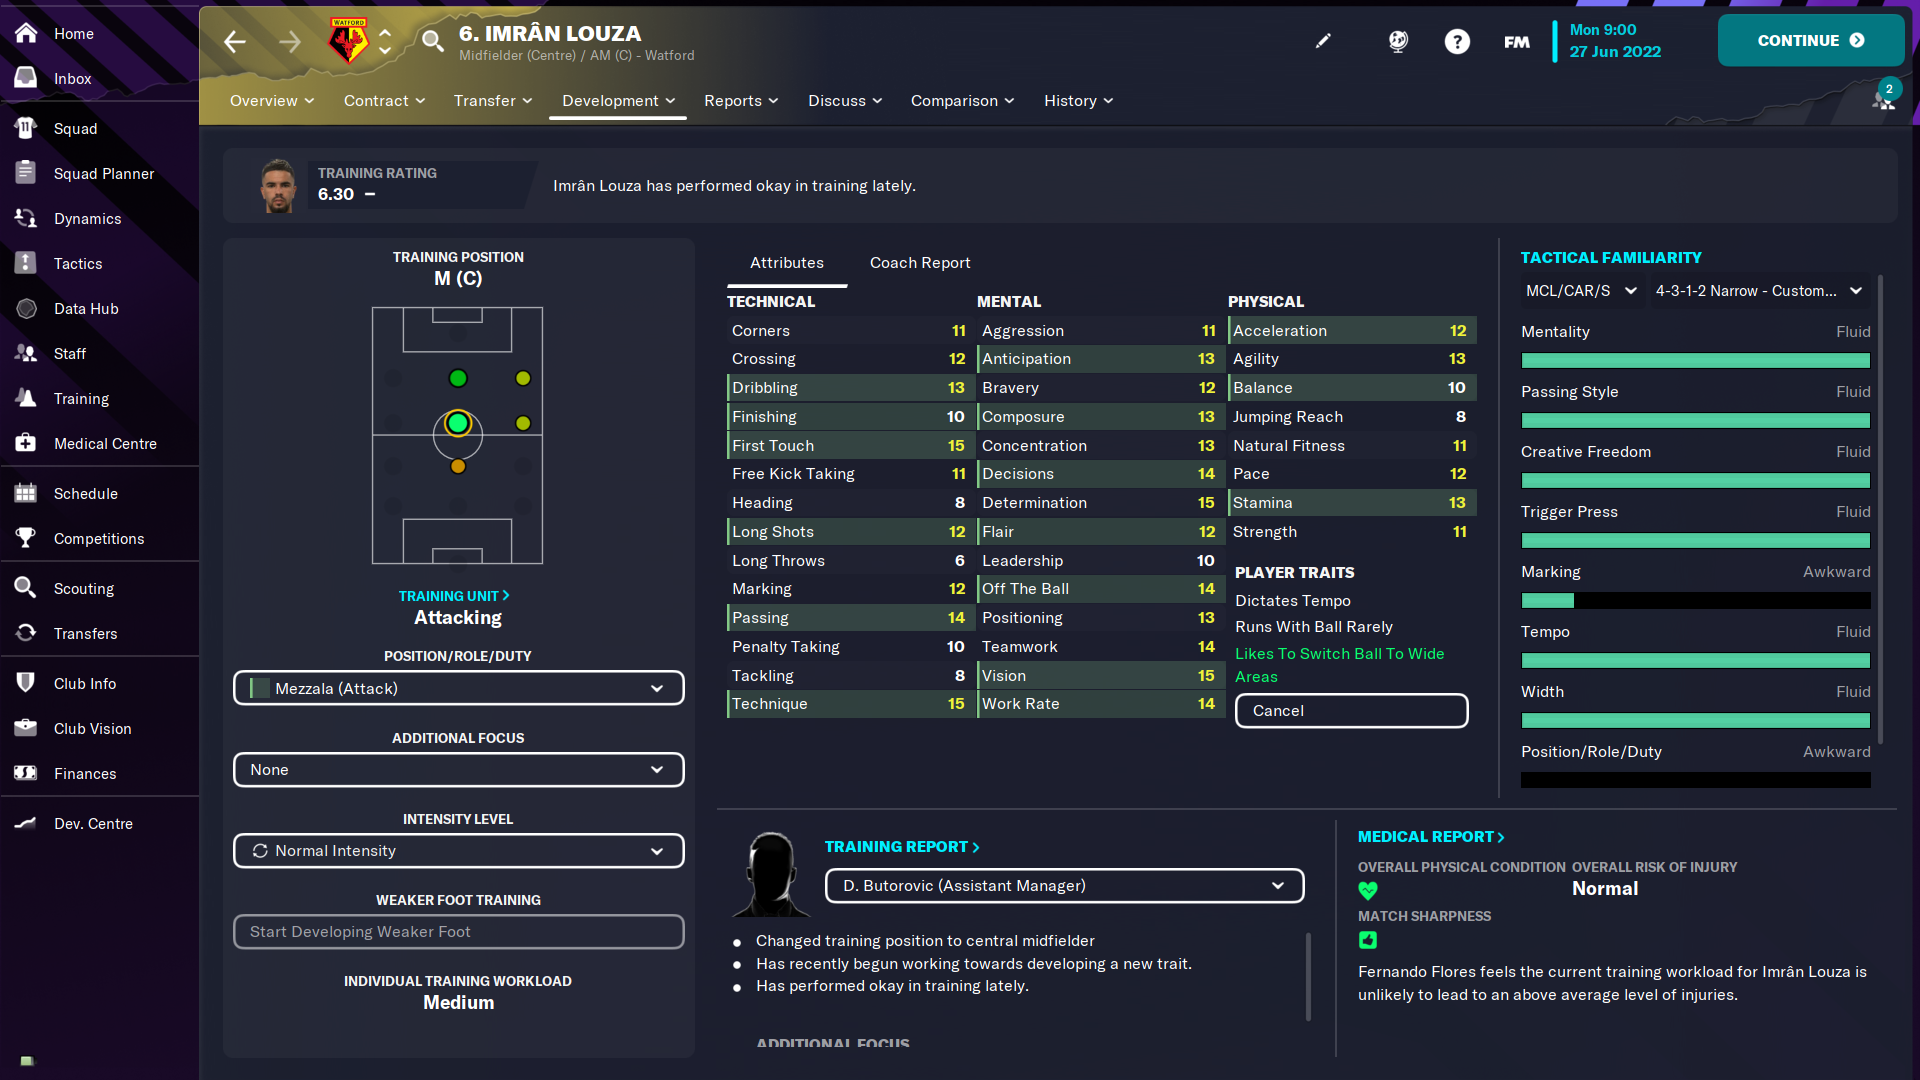
During play, the Target Forward will be the more centrally positioned of the two. They will typically play with their back to goal (if they have the associated Trait, this tendency is accentuated), ready to receive crosses and long passes before flicking them on to onrushing teammates. Therefore, the player you select as your Target Forward needs good Attribute scores for First Touch, Passing and Teamwork, as well as the obvious Jumping Reach, Balance and Strength.
If the Target Forward is one of the few striking roles that actively avoids channel movement unless instructed to do so, the Pressing Forward is one that thrives when operating in the channels. The Pressing Forward is essentially the brains of the operation, moving to wherever the ball is and excelling at retaining it thanks to their strong Technical and Mental Attributes. If you have a quick player in the Pressing Forward role, they’ll excel at helping you create overloads in certain areas of the pitch.
Behind them is an attacking Advanced Playmaker, who can pick up the ball in central areas and move play forward through either dribbling or by playing a killer pass. The most advanced of the four midfield players selected, the Advanced Playmaker is positioned perfectly to act as both a creative force and goalscoring outlet.
In many ways, the advanced playmaker has quite a free role in that they occupy more than one area and fill in gaps left behind by other players. The attack duty added individual instruction to "roam more" both contribute to this behaviour.
The fourth attacking player in the side is the Mezzala. Like the Pressing Forward, this is a role that thrives in the half-spaces.
Much like tactical variety, smart use of space is vital in football. In fact, the two work hand-in-hand. Not only should your players all be doing different things, but they should also be doing these things in different areas of the pitch. For example, if the opposition concentrates its defence in one area (like midfield) then you need to ensure that your attack will not be shut down easily by only attacking through the middle. Instead, your players should maximise the full space of the pitch by splitting their attacks between the two half-spaces and both flanks. In essence, a four-pronged attack.
One way to further improve the effectiveness of the Mezzala in this system is by having them train the ‘Switch Ball’ trait. By having four central midfield players, this trait will encourage the player to push forward into the half-spaces before freeing up teammates who’ve found space in wide areas.
The Extra Man - Midfield Diamond Advantage
In a 4-4-2 Narrow Diamond, unlike in its wide variant, you have the luxury of an extra midfielder. This is usually a defensively-minded player who can offer both protection to the centre-backs and also be an effective recycler of possession, enabling ball progression from your backline through midfield and up to the two strikers.
Rather than having an out-and-out defensive midfielder in this system, I opted for a Central Midfielder with a Defend duty to keep three of my midfield players in the same strata. The increased defensive instincts of this player has the knock-on effect of pushing his two teammates into wider areas of the pitch, giving more protection and coverage on the flanks that we’d otherwise lack with a narrow system. Also worth noting is that while out of possession, this Central Midfielder on Defend tends to drop a bit deeper, becoming a de facto Defensive Midfielder.
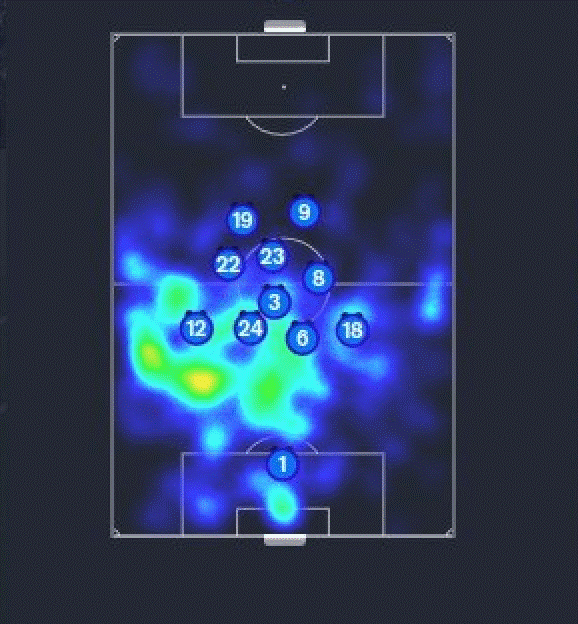
In the image above, you can see a Heat Map indicating the average position of my players. Number three, the Central Midfielder on Defend, clearly drops deeper into DM position. Regardless of whether you’re playing a 4-3-1-2 or 4-1-2-1-2, you still need a midfield player who can focus on defence while his colleagues in midfield provide width and support the attack. In addition, a midfielder with a Defend Duty gives confidence to the other two midfielders to embrace more progressive and risk-taking roles.
As this is a formation without wingers, it is extra important to have the left and right midfielders in the central three able to cover the wider areas. Both the Carrilero and Mezzala roles are perfect for this.
The Carrilero does this in a more conservative manner, acting as more of a "shuttler" between the Advanced Playmaker and the Central Midfielder on Defend. The Mezzala, meanwhile, is essentially an aggressive half-winger, who starts in midfield but then during attacks quickly moves into, and primarily operates in, the advanced half-channel, an area usually reserved for Inside Forwards and Attacking Midfielders. If the players in these Carrilero and Mezzala roles are decent dribblers, you could add an instruction for both players to "run wide with the ball".
If you were the favourite in a particular fixture or you noted that your opponent was sitting quite deep, you could switch the Carrilero to a more progressive role like a Box-to-Box Midfielder. My only advice with this switch would be to instruct the Box-to-Box player to “stay wider” in order to ensure the flanks are still protected.
Do I need a Full-Back or a Wing-Back?
You’ll see in the formation shown above that I’ve got a Full-Back on Attack on the left-hand side and a Wing-Back on Support on the right. There is a method to this approach.
According to his default behaviour on attack duty, the Full-Back will go up and down the flank, providing much-needed width to the narrow formation. He will, however, do this differently from the more technical Wing-Back.
The Wing-Back is essentially sitting behind the attack-minded Mezzala. With that in mind you need a more progressive player who won’t look to just bomb forward and cross at every opportunity. Instead, the Wing-Back will naturally occupy a more advanced position on the pitch, allowing them to better link up with the Mezzala and the Target Forward. In many ways, the Wing-Back in this system performs like a wide box-to-box player.
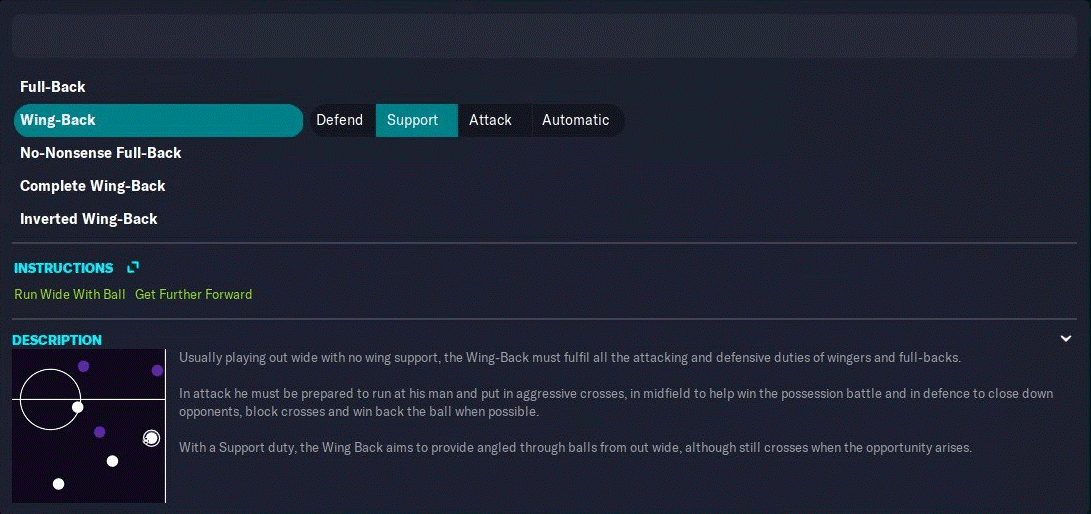
The job of the Full-Back on the left is to stretch play out wide and provide crosses whenever possible. This complements the Carrilero, which is a decidedly less aggressive and ambitious role than the Mezzala on the other side. As I said above, you want players doing different jobs all over the pitch and doing them in a way that complements the roles around them. For both wide defensive roles, the players you select will need good Stamina and Natural Fitness as they’ll need to get through a lot of work in every game.
All of this means that in attack, every role has a specific space that it is assigned to. More importantly, they occupy spaces and move into areas different from other roles in the formation. Both half-space channels are occupied (Mezzala and Pressing Forward), both flanks (Full-Back and Wing-Back) and the advanced central space (Target Forward and Advanced Playmaker).
Defence - Keeping It Tight
Now it’s time to address the defence; the common denominator of all successful tactics. Yes, even the most attacking systems need a very solid defensive setup.
If anything, defence is easier to set up than attack. When you know exactly what you want from your defenders then the roles and instructions will follow naturally.
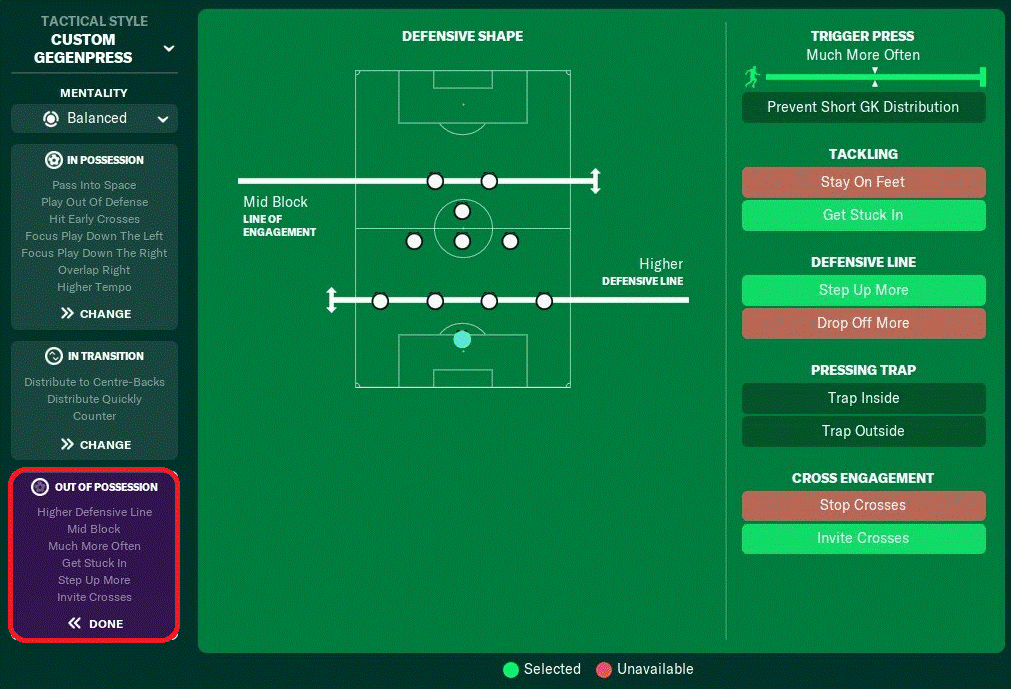
Simply put, I want my defensive unit to narrow their working area as much as possible and be very tough to break down. The more compact they make this space the less distance they'll need to travel to press the opposition and regain the ball, and the more effectively they will be able to defend.
Rather than pressing high, we are operating with a Mid Block. Ultimately, my focus isn’t on what the opposition do in their half, it’s about what my players can do in our half to disrupt their play at every opportunity. Therefore, I add the instructions to Close Down More, Get Stuck In and Mark More Tightly.
Finally, it would not be an article about setting up a tactic with varied roles, that complement each other, without mentioning the most iconic of all role partnerships: stopper and covering central defender (sweeper). These two roles fit each other like a hand and a glove. They are so different in how they perform their duties and that is why you cannot have one without the other.
The stopper is the uncontested physical beast in the duo. Possessing the powerful combination of Strength, Jumping Reach and Heading ability, there are very few who can challenge them in the air. Among the strongest and tallest players on your team, the stopper should have the physique to aggressively and bravely challenge any cross and outjump even the tallest opposition striker. Above average Tackling and Determination can also help him in this regard. However, with height and size usually comes a lack of speed and that means they need a fast and intelligent partner to sweep up any balls (or opposition forwards) that get past the slower stopper.
The covering Centre-Back is everything that the stopper is not: fast and mentally astute. They might not have the raw physical Strength or Jumping Reach of a stopper but they make up for it with exceptional defensive awareness. Specifically, the combination of Anticipation and Positioning that allows them to predict where they need to be to cut attacks off. If, in addition to boasting good Pace and Acceleration, they are a technical player with good Passing, Technique, First Touch and Vision, then opting for the Ball-Playing Defender role is an obvious choice. Along with a good Sweeper-Keeper, a Ball-Playing Defender can be a very effective counter-attack initiator.
Once they form a partnership, a stopper-sweeper duo will be the rock that will keep your defence solid for years to come and improve the whole tactic.
Happy managing,